Transpiler
generate_boxing_pass_manager() 함수는 회로 명령어를 주석이 달린 박스로 묶을 수 있는 qiskit.transpiler.PassManager를 만드는 유연하고 편리한 도구입니다. 회로를 수동으로 묶고 주석을 다는 작업의 손쉬운 대안이며, 워크플로 자동화, 다양한 회로 박싱 전략 테스트 등에 유용합니다.
이 가이드는 generate_boxing_pass_manager()와 그 인수를 사용하는 방법을 설명합니다. 함수의 각 인수가 미치는 효과를 강조하기 위해, 다음 섹션들은 주로 아래 회로를 참조합니다.
from qiskit.circuit import Parameter, QuantumCircuit

circuit = QuantumCircuit(4, 7)
circuit.h(1)
circuit.h(2)
circuit.cz(1, 2)
circuit.h(1)
circuit.cx(1, 0)
circuit.cx(2, 3)
circuit.measure(range(1, 4), range(3))
circuit.cx(0, 1)
circuit.cx(1, 2)
circuit.cx(2, 3)
for qubit in range(4):
    circuit.rz(Parameter(f"th_{qubit}"), qubit)
    circuit.rx(Parameter(f"phi_{qubit}"), qubit)
    circuit.rz(Parameter(f"lam_{qubit}"), qubit)
circuit.measure(range(4), range(3, 7))

circuit.draw("mpl", scale=0.8)

연산을 박스로 그룹화
enable_gates 인수를 True 또는 False로 설정하여 2큐비트 게이트를 박스로 그룹화할지 지정할 수 있습니다. 마찬가지로 enable_measures는 측정을 그룹화할지 여부를 지정합니다. 다음 코드 조각은 게이트와 측정을 모두 그룹화하는 예를 보여 줍니다.
from samplomatic.transpiler import generate_boxing_pass_manager

boxing_pass_manager = generate_boxing_pass_manager(
    enable_gates=True,
    enable_measures=True,
)
transpiled_circuit = boxing_pass_manager.run(circuit)
transpiled_circuit.draw("mpl", scale=0.8)
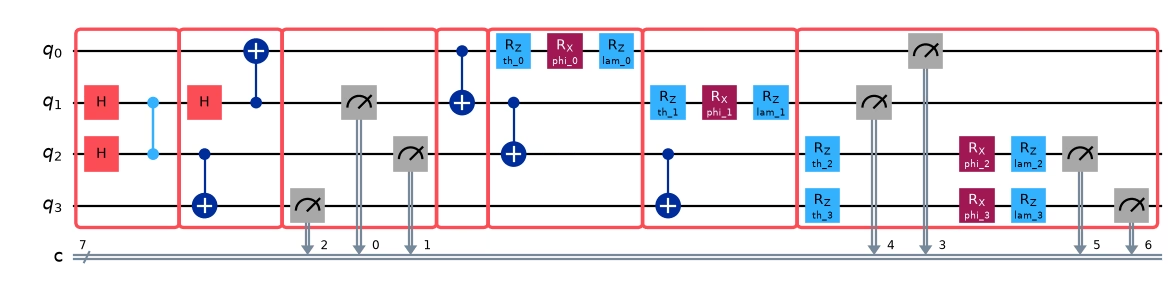
그림에서 볼 수 있듯이 패스 매니저는 두 가지 유형의 박스를 만듭니다. 하나는 2큐비트 게이트 층 하나를 포함하는 박스이고, 다른 하나는 측정 층 하나를 포함하는 박스입니다. 이러한 분리는 보통 동질적인 연산의 층을 대상으로 하는 노이즈 학습 및 완화 프로토콜의 표준 관행을 반영합니다. 2큐비트 게이트와 측정은 이를 수용할 수 있는 가장 왼쪽 박스에 배치되며, 모든 단일 큐비트 게이트는 그 앞에 오는 2큐비트 게이트 또는 측정과 같은 박스에 배치됩니다.
다음 코드는 enable_gates를 False로 설정한 예를 보여 줍니다. 보시다시피 2큐비트 게이트는 박스로 그룹화되지 않으며, 그 앞에 오는 단일 큐비트 게이트도 마찬가지입니다.
boxing_pass_manager = generate_boxing_pass_manager(
    enable_gates=False,
    enable_measures=True,
)
transpiled_circuit = boxing_pass_manager.run(circuit)
transpiled_circuit.draw("mpl", scale=0.8)

박스에 주석을 다는 방법 선택
반환된 회로에서 모든 2큐비트 게이트 박스와 측정 박스는 왼쪽 드레싱 주석을 소유합니다. 특히 2큐비트 게이트를 포함하는 모든 박스에는 Twirl이 주석으로 달립니다. 측정 박스의 경우 사용자는 Twirl, BasisTranform(mode를 "measure"로 설정), 또는 둘 다를 선택할 수 있습니다. 다음 코드는 모든 박스가 트윌링되고, 측정 박스에는 추가로 BasisTranform 주석이 달린 회로를 생성합니다.
boxing_pass_manager = generate_boxing_pass_manager(
    enable_gates=True,
    enable_measures=True,
    measure_annotations="all",
)
transpiled_circuit = boxing_pass_manager.run(circuit)
노이즈 주입을 위한 회로 준비
inject_noise_targets를 사용하면 어떤 박스에 InjectNoise 주석을 달지 지정할 수 있습니다. 예를 들어 다음 코드는 2큐비트 게이트 박스는 InjectNoise 주석을 소유하지만 측정 박스는 소유하지 않는 회로를 생성합니다.
boxing_pass_manager = generate_boxing_pass_manager(
    enable_gates=True,
    enable_measures=True,
    inject_noise_targets="gates",
)
transpiled_circuit = boxing_pass_manager.run(circuit)
회로에 단일 큐비트 게이트를 제외하면 동등한 박스가 둘 이상 있으면, 모두 같은 ref를 가진 InjectNoise 주석이 달립니다. 따라서 반환된 회로에서 고유한 ref의 수는 고유한 박스의 수와 같습니다.
inject_noise_strategy 값은 InjectNoise 주석에 영향을 줍니다. 다음 값을 사용할 수 있습니다.
-
modifier_ref='': 노이즈 맵에서 샘플링하기 전에 수정할 필요가 없을 때 권장됩니다. -
modifier_ref=ref: 모든 노이즈 맵을 같은 배율로 균일하게 조정해야 할 때 권장됩니다. -
고유한
modifier_ref값: 각 노이즈 맵을 서로 다른 배율로 조정해야 할 때 권장됩니다.
다음 코드는 2큐비트 게이트 박스가 고유한 modifier_ref 값을 가진 InjectNoise 주석을 소유하는 회로를 생성합니다.
boxing_pass_manager = generate_boxing_pass_manager(
    enable_gates=True,
    enable_measures=True,
    inject_noise_targets="gates",
    inject_noise_strategy="individual_modification",
)
transpiled_circuit = boxing_pass_manager.run(circuit)
트윌링 전략 선택
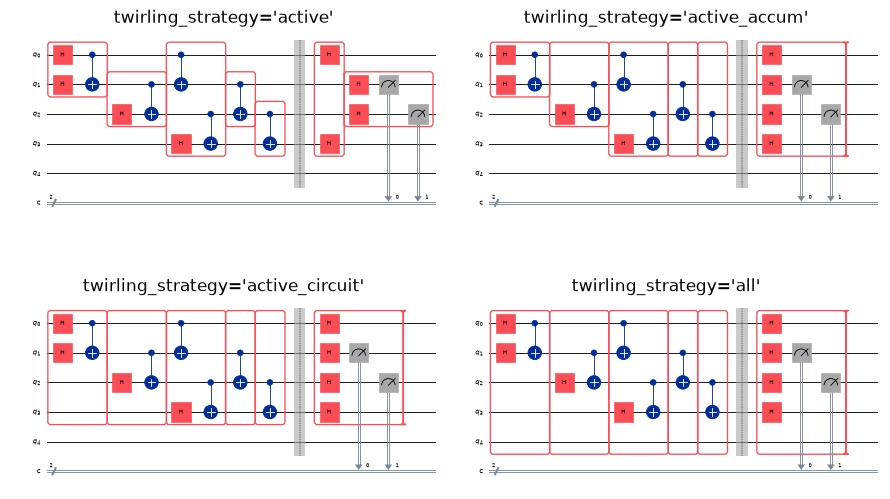
박스 패스 매니저는 먼저 어떤 얽힘 게이트와 측정 명령어를 같은 박스에 둘지 선택합니다. 이 작업이 끝나면 박스는 일반적으로 전체 너비가 아니며, 회로에서 활성 상태이거나 백엔드 타깃에 있는 큐비트의 일부만 포함할 가능성이 높습니다. 박스 패스 매니저의 일반적인 구성에서는 박스 명령어가 작용하는 모든 큐비트가 트윌링되므로(박스 안의 어떤 명령어도 작용하지 않는 큐비트도 포함), 부분 너비 박스를 두면 트윌링의 노이즈 맞춤 효과에 영향을 줍니다. 유휴 큐비트는 트윌링되지 않으며, 예를 들어 박스가 적용되는 동안 코히어런트 오류가 쌓일 수 있습니다. twirling_strategy는 각 박스가 소유하는 큐비트를 확장하여 유휴 큐비트의 수를 변경하는 옵션을 제공합니다.
-
"active"(기본값)는 박스를 유휴 큐비트로 확장하지 않습니다. -
"active_accum"은 회로에서 이전 명령어가 이미 작용한 큐비트로 모든 박스를 확장합니다. 회로 시작 부분의 큐비트가 활성화될 때까지 트윌링하지 않음으로써 가능한 한 오래 바닥 상태로 두고 싶을 때 유용합니다. -
"active_circuit"은 회로의 어떤 명령어든 작용하는 큐비트로 모든 박스를 확장합니다. 얽힘 층이 반복되는 구조화된 회로가 있고, 각 박스마다 노이즈를 학습해야 하므로 고유한 박스의 수를 최소화하고 싶을 때 유용합니다. -
"all"은 회로의 모든 양자 레지스터에 있는 모든 큐비트로 모든 박스를 확장합니다. QPU의 모든 큐비트가 항상 트윌링되도록 하고 싶을 때"active_circuit"의 확장으로 유용합니다.
다음 예제에서는 각 전략을 기본 회로에 적용한 다음 결과를 그립니다.
circuit = QuantumCircuit(5, 2)
circuit.h(range(4))
circuit.cx(0, 1)
circuit.cx(1, 2)
circuit.cx(2, 3)
circuit.cx(0, 1)
circuit.cx(1, 2)
circuit.cx(2, 3)
circuit.barrier()
circuit.h(range(4))
circuit.measure([1, 2], [0, 1])

circuit.draw("mpl", scale=0.6)

import matplotlib.pyplot as plt

plt.figure(figsize=(9, 6))
for idx, strategy in enumerate(["active", "active_accum", "active_circuit", "all"]):
    ax = plt.subplot(2, 2, idx + 1)
    pm = generate_boxing_pass_manager(twirling_strategy=strategy, remove_barriers="never")
    transpiled_circuit = pm.run(circuit)
    fig = transpiled_circuit.draw("mpl", scale=0.8, ax=ax)
    ax.set_title(f"twirling_strategy='{strategy}'")

plt.tight_layout()
배리어 처리 방법 지정
기본적으로 배리어는 모든 얽힘 게이트와 측정 명령어가 지시에 따라 박스로 묶인 뒤(twirling_strategy 선택에 따른 확장 포함), 가능한 경우 단일 큐비트 게이트가 바로 오른쪽 박스에 추가되기 전에 회로에서 제거됩니다.
예를 들어 다음 회로에는 배리어가 있습니다.
circuit_with_barrier = QuantumCircuit(4)
circuit_with_barrier.h(range(4))
circuit_with_barrier.cz(0, 1)
circuit_with_barrier.barrier()
circuit_with_barrier.cz(2, 3)
circuit_with_barrier.measure_all()

circuit_with_barrier.draw("mpl", scale=0.8)

기본 동작은 두 얽힘 게이트가 같은 박스에 들어가지 않도록 하면서도, 배리어가 있어도 단일 큐비트 게이트는 다음 사용 가능한 박스로 흡수되게 합니다.
boxing_pass_manager = generate_boxing_pass_manager()
transpiled_circuit = boxing_pass_manager.run(circuit_with_barrier)
transpiled_circuit.draw("mpl", scale=0.8)

remove_barriers를 'never'로 설정하면 배리어가 유지되어 단일 큐비트 게이트가 제약을 받습니다.
boxing_pass_manager = generate_boxing_pass_manager(remove_barriers="never")

transpiled_circuit = boxing_pass_manager.run(circuit_with_barrier)
transpiled_circuit.draw("mpl", scale=0.8)

마지막으로, 배리어를 즉시 제거하면 얽힘 게이트가 반드시 별도의 박스에 들어가야 한다는 제약이 더 이상 없습니다.
boxing_pass_manager = generate_boxing_pass_manager(remove_barriers="immediately")

transpiled_circuit = boxing_pass_manager.run(circuit_with_barrier)
transpiled_circuit.draw("mpl", scale=0.8)

층화 작동 방식
박스 패스 매니저는 두 가지 핵심 패스를 순서대로 실행합니다.
-
GroupGatesIntoBoxes— 얽힘 게이트를 박스로 층화합니다. 이 단계에서 단일 큐비트 게이트는 무시되며, 2큐비트 게이트만 그룹화됩니다. -
AbsorbSingleQubitGates— 각 단일 큐비트 게이트를 오른쪽에서 가장 가까운 적합한 박스로 흡수합니다.
층화 중에 GroupGatesIntoBoxes는 회로 DAG를 위상 순서로 순회하며 각 2큐비트 게이트를 큐비트가 아직 점유되지 않은 가장 이른 그룹에 배치합니다. 세 종류의 명령어는 해당 큐비트의 현재 그룹을 비우는 구분자 역할을 하여, 그 큐비트의 이후 게이트를 새 그룹에 넣도록 강제합니다.
-
배리어
-
기존 박스 명령어
-
Measurements
단일 큐비트 게이트는 구분자가 아니며 그룹화에 영향을 주지 않고 AbsorbSingleQubitGates가 처리하도록 남겨집니다. 현재는 교환 가능성 분석을 수행하지 않으며, 그룹화는 회로의 위상 순서를 있는 그대로 따릅니다.
remove_barriers="after_stratification"이 권장 기본값인 이유
기본 모드는 "after_stratification"이며, 두 가지 이점을 결합하기 때문입니다.
-
배리어는 얽힘 게이트가 그룹화되는 방식을 제약합니다(층화 중에 구분자로 작용합니다).
-
배리어는
AbsorbSingleQubitGates가 실행되기 전에 제거되므로, 단일 큐비트 게이트는 이전 배리어 위치를 가로질러 이동하여 가장 가까운 박스로 흡수될 수 있습니다.
반면에:
-
"never"는 배리어를 끝까지 유지하므로 단일 큐비트 게이트가 배리어와 박스 사이에 갇혀 흡수되지 못하고, 회로에 트윌링되지 않은 회전이 남게 됩니다. -
"immediately"는 층화 전에 배리어를 제거하므로 배리어가 그룹화에 영향을 주지 않습니다. -
"finally"는 출력 회로에 배리어를 남기고 싶을 때(예: 시각화를 위해) 유용하지만, 배리어와 박스 사이의 단일 큐비트 게이트는 흡수되지 않습니다.
배리어가 있는 박스 ISA 회로
Trotter화된 해밀토니언 시뮬레이션, 변분 ansatz, 오류 증폭 시퀀스처럼 반복 구조를 가진 회로는 보통 프로그래밍 방식으로 만든 다음 ISA 형태로 트랜스파일합니다. 트랜스파일된 회로에 박스를 직접 추가하는 일은 번거롭기 때문에, 자연스러운 워크플로는 다음과 같습니다.
-
박스 경계로 삼고 싶은 레이어 경계에 배리어를 삽입하면서 논리 회로를 만듭니다.
-
ISA 회로로 트랜스파일합니다. Qiskit의 Transpiler는 라우팅과 최적화 과정에서도 배리어를 보존합니다.
-
ISA 회로에
generate_boxing_pass_manager()를 실행합니다.
한 레이어의 끝이 모든 큐비트를 덮지 않을 때 배리어가 필요합니다. 그렇지 않으면 그리디 알고리즘이 다음 레이어의 게이트 중 이 "비어 있는" 큐비트에 걸리는 것들을 같은 그룹에 넣어 버립니다. 구체적인 예로, 5큐비트 링에서 2단계 Heisenberg ZZ 시뮬레이션을 생각해 보세요. 각 Trotter 단계에는 세 개의 결합 레이어가 있습니다. 짝수 결합 (0,1), (2,3), 홀수 결합 (1,2), (3,4), 그리고 순환 결합 (4,0)입니다. 홀수 결합 레이어 이후에는 큐비트 0과 4가 모두 비어 있습니다. 배리어가 없으면 순환 결합 (4,0)이 이 빈 큐비트를 사용하는 다음 Trotter 단계의 결합들과 그리디하게 묶여, 서로 다른 단계의 게이트가 같은 박스에 섞이게 됩니다.
from qiskit.circuit import Parameter, QuantumCircuit

n = 5  # 5-qubit ring: bonds (0,1), (1,2), (2,3), (3,4), (4,0)
dt = Parameter("dt")
heisenberg = QuantumCircuit(n)

for step in range(2):
    # Layer 1: even bonds (0,1) and (2,3)
    for idx in range(0, n - 1, 2):
        heisenberg.rzz(dt, idx, idx + 1)
    heisenberg.barrier()
    # Layer 2: odd bonds (1,2) and (3,4) -- qubits 0 and 4 are now free
    for idx in range(1, n - 1, 2):
        heisenberg.rzz(dt, idx, idx + 1)
    heisenberg.barrier()
    # Layer 3: wrap bond (4,0) -- both qubits were free after layer 2
    heisenberg.rzz(dt, n - 1, 0)
    if step < 1:
        heisenberg.barrier()  # separates the two Trotter steps

heisenberg.measure_all()

heisenberg.draw("mpl", scale=0.7)

다음 코드는 기반 장치가 CX를 네이티브 얽힘 게이트로 가진다고 가정하고 회로를 ISA 형태로 트랜스파일합니다. 배리어가 트랜스파일 후에도 유지되어 출력 회로에 그대로 보인다는 점에 유의하세요.
from qiskit.transpiler import generate_preset_pass_manager

preset_pm = generate_preset_pass_manager(
    basis_gates=["rz", "sx", "cx"],
    coupling_map=[[0, 1], [1, 2], [2, 3], [3, 4], [4, 0]],
    optimization_level=1,
)
isa_circuit = preset_pm.run(heisenberg)
isa_circuit.draw("mpl", scale=0.5, fold=200)

다음으로 ISA 회로에 박스 생성 패스 매니저를 적용합니다. 세 개의 결합 레이어는 각 Trotter 단계에서 각각 별도의 박스가 됩니다.
boxing_pm = generate_boxing_pass_manager()
boxed_isa = boxing_pm.run(isa_circuit)
boxed_isa.draw("mpl", scale=0.5, fold=100)

Samplomatic의 패스 매니저를 Qiskit 프리셋 패스 매니저에 통합하기
아래 코드는 generate_boxing_pass_manager()를 Qiskit 프리셋 패스 매니저에 통합하는 방법을 보여줍니다. 트랜스파일된 회로는 ISA이며 박스를 포함합니다.
from qiskit.transpiler import generate_preset_pass_manager

preset_pass_manager = generate_preset_pass_manager(
    basis_gates=["rz", "sx", "cx"],
    coupling_map=[[0, 1], [1, 2]],
    optimization_level=0,
)
boxing_pass_manager = generate_boxing_pass_manager()

# Run the boxing pass manager after the scheduling stage
preset_pass_manager.post_scheduling = boxing_pass_manager

circuit = QuantumCircuit(3)
circuit.h(0)
circuit.cx(0, 1)
circuit.cx(0, 2)
circuit.measure_all()

transpiled_circuit = preset_pass_manager.run(circuit)
transpiled_circuit.draw("mpl", scale=0.8)

이 패턴은 배리어 기반 ISA 박싱 워크플로와도 자연스럽게 결합됩니다. 박스 생성 패스 매니저는 스케줄링 이후 단계로 실행되며, 원래 논리 회로의 배리어가 트랜스파일 이후에도 유지되므로 예상대로 계층화를 안내합니다.
preset_pm = generate_preset_pass_manager(
    basis_gates=["rz", "sx", "cx"],
    coupling_map=[[0, 1], [1, 2], [2, 3], [3, 4], [4, 0]],
    optimization_level=1,
)
preset_pm.post_scheduling = generate_boxing_pass_manager()

boxed_heisenberg = preset_pm.run(heisenberg)
boxed_heisenberg.draw("mpl", scale=0.5, fold=100)

주석 검사 및 수정
자동 박싱 후에는 특정 박스의 주석을 검사하거나 조정하고 싶을 수 있습니다. 예를 들어 노이즈 주입을 추가하거나, 주석을 제거하거나, 트월링 그룹을 변경하는 경우입니다. Samplomatic은 이를 위해 samplomatic.utils에 유틸리티 함수 모음을 제공합니다. 모든 함수는 원본을 수정하지 않고 새 회로를 반환합니다.
extend_annotations()는 회로의 모든 박스에 하나 이상의 주석을 추가합니다.
from samplomatic import InjectNoise, Twirl
from samplomatic.utils import extend_annotations

boxed = generate_boxing_pass_manager().run(circuit_with_barrier)

# Add InjectNoise to every box
with_noise = extend_annotations(boxed, InjectNoise("my_noise_ref"))
with_noise.draw("mpl", scale=0.8)
filter_annotations()는 지정한 유형의 주석만 남기고 나머지를 제거합니다. replace_annotations()는 각 주석에 콜러블을 적용하며, 콜러블은 그 자리에 대신 넣을 주석 리스트를 반환합니다(제거하려면 [], 교체하려면 요소가 하나인 리스트, 확장하려면 요소가 여러 개인 리스트를 반환).
from samplomatic.utils import filter_annotations, replace_annotations

# Keep only Twirl annotations, drop everything else
twirl_only = filter_annotations(with_noise, Twirl)

# Replace the twirling group on every Twirl annotation
updated = replace_annotations(
    twirl_only, lambda a: [Twirl(group="local_c1")] if isinstance(a, Twirl) else [a]
)
범용 map_annotations() 함수는 주석 리스트를 새 리스트로 매핑하는 모든 콜러블을 받으므로, 박스별 변환을 완전히 제어할 수 있습니다. strip_annotations()는 모든 박스에서 모든 주석을 제거하는 편의 래퍼입니다.
모든 게이트 박스에 InjectNoise를 추가하는 것과 같은 일괄 변경에는 generate_boxing_pass_manager()의 inject_noise_targets 매개변수가 가장 간결한 방법입니다. 이 유틸리티는 패스 매니저 매개변수로 다룰 수 없는 박스별 선택적 편집에 유용합니다.
회로 빌드
generate_boxing_pass_manager()가 만든 모든 패스 매니저는 build()로 템플릿/samplex 쌍으로 성공적으로 변환할 수 있는 회로를 반환합니다. 예를 들어 다음 코드는 박스 생성 패스 매니저가 만든 회로에 build() 함수를 호출합니다.
from samplomatic import build

boxing_pass_manager = generate_boxing_pass_manager(
    enable_gates=True,
    enable_measures=True,
)
transpiled_circuit = boxing_pass_manager.run(circuit)

template, samplex = build(transpiled_circuit)
트랜스파일된 모든 회로를 성공적으로 빌드할 수 있도록, 패스 매니저는 필요할 때 추가 박스를 포함하는 방법을 알고 있습니다. 예를 들어 측정되지 않은 큐비트 0으로 끝나는 아래 회로를 생각해 보세요.
circuit_with_unmeasured_qubit = QuantumCircuit(4, 3)
circuit_with_unmeasured_qubit.cz(0, 1)
circuit_with_unmeasured_qubit.cz(2, 3)
for qubit in range(4):
    circuit_with_unmeasured_qubit.rz(Parameter(f"th_{qubit}"), qubit)
    circuit_with_unmeasured_qubit.rx(Parameter(f"phi_{qubit}"), qubit)
    circuit_with_unmeasured_qubit.rz(Parameter(f"lam_{qubit}"), qubit)
circuit_with_unmeasured_qubit.measure(range(1, 4), range(3))

circuit_with_unmeasured_qubit.draw("mpl", scale=0.8)

게이트와 측정 주위에 왼쪽 드레스드 박스를 그리면 큐비트 0에 수집되지 않은 가상 게이트가 남게 되고, 이 회로에 build()를 호출하면 오류가 발생합니다. 이를 피하기 위해 generate_boxing_pass_manager()가 반환하는 패스 매니저는 수집기 역할을 하는 오른쪽 드레스드 박스를 추가할 수 있습니다. 예를 들어 다음 코드에서는 큐비트 0이 수집되지 않은 가상 게이트를 받아 내는 오른쪽 드레스드 박스로 끝납니다. 큐비트 0에 작용하는 단일 큐비트 게이트도 결과 회로의 깊이를 최소화하기 위해 이 박스 안에 함께 배치됩니다.
boxing_pass_manager = generate_boxing_pass_manager(
    enable_gates=True,
    enable_measures=True,
)
transpiled_circuit = boxing_pass_manager.run(circuit_with_unmeasured_qubit)
transpiled_circuit.draw("mpl", scale=0.8)

또 다른 예로, 박스로 묶이지 않은 측정 때문에 수집되지 않은 채 남게 될 가상 게이트를 수집하기 위해 오른쪽 드레스드 박스가 추가됩니다.
boxing_pass_manager = generate_boxing_pass_manager(
    enable_gates=True,
    enable_measures=False,
)
transpiled_circuit = boxing_pass_manager.run(circuit_with_unmeasured_qubit)
transpiled_circuit.draw("mpl", scale=0.8)
