확률적 오류 증폭을 사용한 zero-noise 외삽
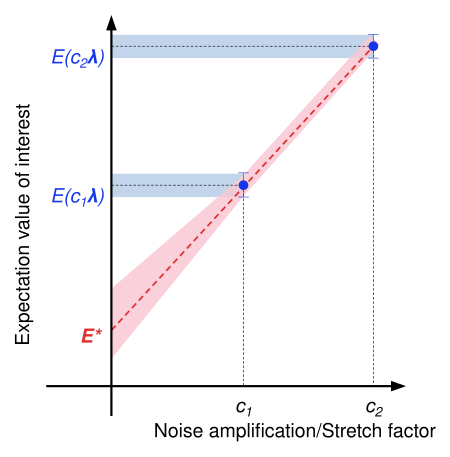
Zero-noise 외삽(ZNE)은 관측량 기댓값 계산에서 양자 노이즈를 완화하는 기법입니다. 양자 회로를 점점 커지는 노이즈 스케일에서 실행하고, 그 노이즈 스케일에 대한 기댓값을 구한 다음, 외삽하여 zero-noise 기댓값을 추정하는 방식으로 작동합니다. 노이즈 증폭 단계와 외삽 단계는 모두 다양한 방식으로 구현할 수 있습니다. 이 가이드에서는 "Evidence for the utility of quantum computing before fault tolerance"에서 제안된 확률적 오류 증폭(PEA)으로 노이즈를 증폭합니다. PEA로 증폭하려면 먼저 회로의 얽힘 gate에 영향을 주는 노이즈를 모델링해야 합니다. 노이즈 모델이 필요 없는 디지털 gate folding으로도 증폭을 구현할 수 있으며, 이는 gate folding 가이드에서 다룹니다. qiskit-noise-learning으로 노이즈를 학습하고 내장된 지수 피팅 전략으로 외삽합니다.
ZNE는 다른 방법보다 낮은 샘플링 비용으로 양자 노이즈를 완화하는 데 효과적일 수 있지만, 편향(bias)에 대한 한계가 없다는 점을 유념하세요.
워크플로는 다음과 같습니다.
- 회로와 관측량 지정
- Qiskit의 statevector 시뮬레이터로 정확한 기댓값 계산
- 노이즈가 있는, 완화되지 않은 기댓값 계산
qiskit-noise-learning으로 얽힘 레이어의 노이즈 학습- 확률적 오류 증폭으로 ZNE 프로그램을 준비하고 노이즈 스케일이 다른 회로를 샘플링
- zero-noise 극한까지 외삽
- 완화된 기댓값 비교
회로와 관측량 지정
이 가이드에서는 링 토폴로지의 8개 큐비트에서 Trotter화된 횡자기장 Ising 모델(TFIM)의 사이트 평균 자화 를 계산합니다. 횡자기장 세기의 여러 값을 훑으면서 자화를 자기장 세기의 함수로 그립니다. 짝수 개의 큐비트로 이루어진 링 토폴로지에서는 아래 커플링 맵의 빨간색과 초록색이 보여 주듯이 두 큐비트 gate 레이어를 두 개의 고유한 레이어로 나눌 수 있습니다. 노이즈 모델을 학습하려는 경우 고유한 레이어는 독립적으로 학습해야 하므로, 고유한 얽힘 레이어의 집합이 최소가 되도록 회로를 설계하는 것이 중요합니다. 회로에 고유한 레이어가 너무 많으면 많은 레이어를 학습하는 샘플링 비용 때문에 노이즈 학습이 불가능해질 수 있습니다.
# Added by doQumentation — installs the packages this notebook needs if they are missing
import importlib.util

_needed = {"IPython": "IPython", "matplotlib": "matplotlib", "numpy": "numpy", "qiskit": "qiskit", "qiskit_aer": "qiskit-aer", "qiskit_ibm_runtime": "qiskit-ibm-runtime", "qiskit_mitigation": "qiskit-mitigation", "qiskit_noise_learning": "qiskit-noise-learning", "samplomatic": "samplomatic", "scipy": "scipy"}
_missing = [pip for module, pip in _needed.items()
            if importlib.util.find_spec(module) is None]
# One at a time, so a package that fails to install does not block the others
for _pip in _missing:
    %pip install -q {_pip}
if not _missing:
    print("\u2713 All required packages are installed")
import warnings

import IPython.display
import numpy as np
from qiskit.circuit import Parameter, QuantumCircuit
from qiskit.quantum_info import SparsePauliOp
from qiskit.visualization import plot_coupling_map

warnings.filterwarnings("ignore")

def trotter_circuit(num_qubits, theta, layers, num_steps):
    """Trotterized transverse-field Ising evolution: RX on every site, then a CZ layer per coupling layer."""
    circuit = QuantumCircuit(num_qubits)
    for _ in range(num_steps):
        circuit.rx(theta, range(num_qubits))
        for layer in layers:
            circuit.barrier()
            for edge in layer:
                circuit.cz(*edge)
                circuit.sdg(edge)
            circuit.barrier()
    return circuit

num_qubits = 8
trotter_steps = 15
ring_coupling = [(i, (i + 1) % num_qubits) for i in range(num_qubits)]
layers = [
    ring_coupling[0::2],
    ring_coupling[1::2],
]  # two disjoint layers of CZ gates
theta = Parameter("theta")
circuit = trotter_circuit(num_qubits, theta, layers, trotter_steps)

# Parameter values: theta in [0, 0.25 pi] - values for the transverse-field sweep
data_points = 6
parameter_values = np.linspace(0, 0.25 * np.pi, data_points).reshape(
    (data_points, 1)
)

# Define observables - Z on each site
observables = [
    SparsePauliOp("I" * (num_qubits - q - 1) + "Z" + "I" * q)
    for q in range(num_qubits)
]

print("Edges of the same color may execute their gates simultaneously.")
IPython.display.display(
    plot_coupling_map(
        num_qubits=num_qubits,
        qubit_coordinates=None,
        coupling_map=ring_coupling,
        figsize=(4, 4),
        qubit_size=150,
        line_width=5,
        line_color=[
            "red" if edge in layers[0] else "green" for edge in ring_coupling
        ],
        font_size=90,
    )
)
print("Visualization of 1 Trotter step")
trotter_circuit(num_qubits, theta, layers, 1).draw("mpl", scale=0.7)
Edges of the same color may execute their gates simultaneously.

Visualization of 1 Trotter step

Qiskit의 statevector 시뮬레이터로 정확한 기댓값 계산
Qiskit의 Statevector 클래스를 사용하여 의 모든 값에 대해 각 사이트에서 의 정확한 기댓값을 계산합니다.
from qiskit.quantum_info import Statevector
import matplotlib.pyplot as plt

exact_evs = np.array(
    [
        [
            Statevector(circuit.assign_parameters([value]))
            .expectation_value(obs)
            .real
            for value in parameter_values.ravel()
        ]
        for obs in observables
    ]
)  # shape (observables, parameter values)

x_vals = parameter_values.ravel() / np.pi
fig, ax = plt.subplots(figsize=(7, 4))
ax.plot(x_vals, exact_evs.mean(axis=0), "ko-", label="Exact")
ax.set_xlabel(r"$\theta/\pi$")
ax.set_ylabel(r"$\langle Z \rangle_{\text{avg}}$")
ax.legend()
plt.tight_layout()
plt.show()

노이즈가 있는, 완화되지 않은 기댓값 계산
QuantumProgram은 Executor primitive에 적합한 형식의 양자 회로와 samplex를 담고 있습니다. MitigationTask.prepare는 회로, 관측량, 파라미터 값으로 QuantumProgram을 만들고, 주어진 boxing 옵션으로 회로를 box로 묶습니다. measure_annotations boxing 옵션을 "change_basis"로 설정하여 측정을 필요한 기저로 회전시키고, 시뮬레이터가 노이즈 모델을 회로의 box에 매핑할 수 있도록 add_tags: "unique_box"를 추가합니다. 프로그램은 기본적으로 Pauli 트위링되며, 이는 하드웨어에서 코히런트 노이즈를 완화 방법이 가정하는 Pauli 노이즈로 바꿉니다. num_randomizations는 각 회로에서 트위링된 인스턴스를 몇 개 샘플링할지 정하고, shots_per_randomization은 각 인스턴스가 몇 샷을 받을지 정하므로, 둘의 곱이 회로당 샷 예산이 됩니다.
QPU에 접근할 수 있는 사용자는 QiskitRuntimeService의 Backend로 만든 Executor로 프로그램을 실행합니다. 여기서는 Executor에 AerSimulator를 전달하여 프로그램을 로컬에서 실행하고, 시뮬레이터 옵션 layer_noise_model을 사용해 모든 얽힘 Gate 레이어에 무작위 Pauli-Lindblad 노이즈 모델을 주입합니다. 이 노이즈 모델은 qiskit-mitigation의 random_pauli_lindblad_noise로 생성하며, 레이어드 Gate당 오류(EPLG)는 현재 Heron QPU의 일반적인 값인 0.003입니다.
from qiskit.circuit import CircuitInstruction
from qiskit.quantum_info import PauliLindbladMap, pauli_basis
from qiskit_aer import AerSimulator
from qiskit_ibm_runtime import Executor
from qiskit_mitigation import MitigationTask, find_combined_unique_layers

def generate_random_pauli_lindblad_noise(
    layers,
    num_qubits: int,
    eplg: float = 3e-3,
    seed: int | None = None,
) -> list[tuple[CircuitInstruction, PauliLindbladMap]]:
    """Generate random Pauli-Lindblad noise over the full Pauli basis."""
    layer_noise_model = []
    for layer in layers:
        layer_instructions = layer.operation.params[0]
        contain_measurement = any(
            inst.name.startswith("measure") for inst in layer_instructions
        )
        if contain_measurement:  # do not add measurement noise
            layer_noise = PauliLindbladMap.identity(num_qubits)
        else:
            edges = [
                (inst.qubits[0]._index, inst.qubits[1]._index)
                for inst in layer_instructions
            ]  # extract the edges of the layer

            basis_paulis = [p for p in pauli_basis(2) if np.sum(p.x + p.z)]
            rng = np.random.default_rng(seed=seed)
            num_generators = len(basis_paulis)
            rates = rng.random(len(basis_paulis)) * eplg / num_generators

            layer_noise = PauliLindbladMap.from_sparse_list(
                [
                    (pauli.to_label(), edge, rate)
                    for pauli, rate in zip(basis_paulis, rates, strict=True)
                    for edge in edges
                ],
                num_qubits=num_qubits,
            )
        layer_noise_model.append((layer, layer_noise))
    return layer_noise_model

num_randomizations = 50
shots_per_randomization = 64

boxing_options = {
    "measure_annotations": "change_basis",
    "add_tags": "unique_box",
}

# find the unique layers to generate the layered noise for
box_layers = find_combined_unique_layers(
    [circuit], custom_boxing_options=boxing_options
)
layer_noise_model = generate_random_pauli_lindblad_noise(
    box_layers, num_qubits, seed=42
)

# a local noisy simulator in place of a QPU backend
noisy_executor = Executor(
    AerSimulator(),
    options={"simulator": {"layer_noise_model": layer_noise_model}},
)

task = MitigationTask()
program = task.prepare(
    circuit=circuit,
    observables=observables,
    parameters=parameter_values,
    num_randomizations=num_randomizations,
    shots_per_randomization=shots_per_randomization,
    custom_boxing_options=boxing_options,
)
program._semantic_role = "simulation"  # flag the program for the simulator
unmitigated_res = task.postprocess(noisy_executor.run(program).result())

fig, ax = plt.subplots(figsize=(7, 4))
ax.plot(x_vals, exact_evs.mean(axis=0), "k-", label="Exact")
ax.errorbar(
    x_vals,
    np.mean(unmitigated_res.data.evs, axis=0),
    np.mean(unmitigated_res.data.stds, axis=0),
    fmt="o-",
    label="Unmitigated",
)
ax.set_xlabel(r"$\theta/\pi$")
ax.set_ylabel(r"$\langle Z \rangle_{\text{avg}}$")
ax.legend()
plt.tight_layout()
plt.show()

qiskit-noise-learning으로 얽힘 레이어의 노이즈 학습하기
PEA는 Circuit에 있는 각 얽힘 Gate 레이어의 twirling된 노이즈 모델을 학습하는 것으로 시작합니다. 마르코프 노이즈 모델을 가정하며, Circuit의 깊이가 특정 얽힘 레이어의 노이즈 채널에 영향을 주지 않는다고 보기 때문에 고유한 얽힘 Gate 레이어마다 노이즈 모델만 학습하면 됩니다. 학습된 노이즈 모델이 정확할수록 증폭도 더 정확해집니다.
노이즈 학습에는 qiskit-noise-learning을 사용합니다. 학습기는 학습용 Circuit에서 각 레이어를 fragment_depths번 반복하고, 각 Circuit을 num_randomizations번 twirling하며, 측정된 충실도의 감쇠를 Pauli-Lindblad 모델에 맞춥니다. 다음 코드는 두 레이어를 하나의 맵으로 합쳐 학습된 노이즈 모델을 그립니다. 각 Qubit은 두 레이어에 걸쳐 합산한 가중치 1의 X, Y, Z 비율을 파이 차트로 나타내고, 각 엣지는 학습된 가중치 2의 비율을 보여줍니다. 3e-4라는 비율은 레이어를 10,000번 사용할 때 해당 오류가 대략 세 번 발생한다는 뜻입니다.
from qiskit.providers.fake_provider import GenericBackendV2
from qiskit.quantum_info import PauliList
from qiskit_ibm_runtime.results import LayerError, PauliLindbladError
from qiskit_ibm_runtime.visualization.embeddings import Embedding
from qiskit_mitigation import PEA
from qiskit_noise_learning.aer_executor import AerExecutor
from qiskit_noise_learning.noise_learner import LearningOptions, NoiseLearner
from samplomatic import InjectNoise, Tag
from samplomatic.utils import get_annotation

backend = GenericBackendV2(
    num_qubits=num_qubits,
    basis_gates=["id", "rz", "sx", "x", "cz"],
    coupling_map=ring_coupling,
)

task_pea = PEA()
# learn only the layers PEA will inject noise into, i.e. not the measurement layer
pea_layers = [
    layer
    for layer in task_pea.find_unique_layers(circuit, boxing_options)
    if get_annotation(layer.operation, InjectNoise)
]

learning_options = LearningOptions(
    fragment_depths=[2, 4, 8, 16],
    num_randomizations=50,
    shots_per_randomizations=64,
)
# qiskit-noise-learning is not compatible with the Executor in local mode,
# and requires the simulator present in the package for running simulation
noise_dict = {
    get_annotation(layer.operation, Tag).ref: noise_layer
    for layer, noise_layer in layer_noise_model
}
noise_learner_simulator = AerExecutor(
    qasm_simulator=AerSimulator(), noise_dict=noise_dict
)
learner = NoiseLearner(
    backend, options=learning_options, executor=noise_learner_simulator
)
learned_noise = (
    learner.run(pea_layers).result().to_dict()
)  # keyed by InjectNoise reference

# Draw the learned model on the ring, laid out as a square with the qubits in ring order.
# Composing the two layers' maps sums their rates, giving one map over all the ring's edges.
embedding = Embedding(
    [(0, 0), (0, 2), (0, 4), (2, 4), (4, 4), (4, 2), (4, 0), (2, 0)],
    ring_coupling,
)
first, second = learned_noise.values()
learned_model = first.compose(second).simplify()
error = PauliLindbladError(
    PauliList(
        learned_model.get_qubit_sparse_pauli_list_copy().to_pauli_list()
    ),
    learned_model.rates,
)
fig = LayerError(circuit, list(range(num_qubits)), error).draw_map(
    embedding, radius=0.4, height=460, width=620
)
fig.update_traces(
    marker={
        "cmin": 0,
        "cmax": max(learned_model.rates),
        "colorbar": {"tickformat": ".1e", "title": "rate"},
    },
    selector={"mode": "markers"},
)
fig.show()

확률적 오류 증폭으로 ZNE 프로그램을 준비하고 다양한 노이즈 스케일의 Circuit 샘플링하기
여기서는 노이즈 스케일이 증가하는 Circuit들을 담은 ZNE 프로그램을 준비합니다. PEA에서 각 노이즈 인자는 Circuit이 겪는 학습된 노이즈의 배수를 나타냅니다. 예를 들어 노이즈 인자 2.0은 각 레이어가 원래 가진 노이즈 위에, 해당 레이어 뒤에 그 레이어의 학습된 노이즈 채널을 한 번 더 주입합니다. PEA는 Gate를 반복하는 대신 학습된 노이즈 비율을 직접 조정하므로 정수가 아닌 값을 포함해 어떤 노이즈 인자도 가능하며, Circuit 자체는 수정되지 않습니다. 프로그램 항목들은 하나의 템플릿 Circuit을 공유하고 samplex가 주입하는 노이즈만 다릅니다. 주입되는 노이즈는 무작위화마다 한 번씩 샘플링되므로 PEA의 통계적 오차는 무작위화당 shot 수가 아니라 무작위화 횟수로 조절됩니다. 따라서 무작위화는 많이, 각각의 shot은 적게 사용하여 전체 shot 수를 완화하지 않은 프로그램과 같게 유지합니다. 무작위화 횟수를 너무 적게 쓰지 않는 것이 중요합니다. 그렇지 않으면 노이즈 주입에서 샘플링 편향이 생길 수 있습니다.
전체 샘플링 오버헤드는 노이즈 인자의 수에 비례하여 선형적으로 증가합니다.
noise_factors = [1, 2, 3]
program_pea = task_pea.prepare(
    circuit=circuit,
    observables=observables,
    parameters=parameter_values,
    num_randomizations=200,
    shots_per_randomization=16,
    custom_boxing_options=boxing_options,
    noise_maps=learned_noise,
    noise_factors=noise_factors,
)
마지막으로 노이즈가 있는 시뮬레이터에서 프로그램을 실행합니다. 그 결과는 다음 단계의 외삽에 사용됩니다.
program_pea._semantic_role = (
    "simulation"  # flag the program for the simulator
)
job_pea_results = noisy_executor.run(program_pea).result()
영 노이즈 극한으로 외삽하기
이제 각 노이즈 스케일의 데이터가 있으므로, 데이터에 함수를 맞추고 영 노이즈 값으로 다시 외삽하여 노이즈가 없는 관측량의 기댓값을 추정할 수 있습니다. Pauli 노이즈에서는 관측량이 노이즈 인자에 따라 지수적으로 감쇠하므로, 먼저 지수 외삽기를 선택하고 지수 피팅이 실패하면 선형 외삽기로 대체합니다. 외삽을 시각화하기 위해 각 노이즈 인자에서 계산한 사이트 평균 자화, 지수 피팅, 그리고 영 노이즈 지점에서 외삽된 기댓값의 사이트 평균을 그립니다. 이 관측량에서는 피팅이 값을 약간 낮게 추정하는 것을 볼 수 있습니다.
from scipy.optimize import curve_fit

pea_mitigated_res = task_pea.postprocess(
    job_pea_results, extrapolator=["exponential", "linear"]
)

# The result holds the expectation value at each noise factor and the extrapolated value for
# every observable; we average them over the sites and fit the same model to draw the curve.
angle = 3  # theta = 0.15 pi, the angle with the largest unmitigated error
amplifications = pea_mitigated_res.data.evs_noise_factors[:, angle, :].mean(
    axis=0
)
x_fit = np.linspace(0, max(noise_factors), 51)
params, _ = curve_fit(
    lambda x, a, b: a * np.exp(b * x),
    noise_factors,
    amplifications,
    p0=[1.0, -0.1],
)

plt.plot(
    noise_factors, amplifications, "o", color="red", label="amplifications"
)
plt.plot(
    x_fit,
    params[0] * np.exp(params[1] * x_fit),
    "--",
    color="black",
    label="exponential fit",
)
plt.plot(
    [0],
    pea_mitigated_res.data.evs[:, angle].mean(),
    "*",
    color="black",
    markersize=15,
    label="extrapolation",
)
plt.plot(
    [0],
    exact_evs[:, angle].mean(),
    "_",
    color="red",
    markersize=15,
    markeredgewidth=3,
    label="exact",
)
plt.xlabel("noise factor")
plt.ylabel(r"$\langle Z \rangle_{\text{avg}}$")
plt.legend()
plt.show()

완화된 기댓값 비교하기
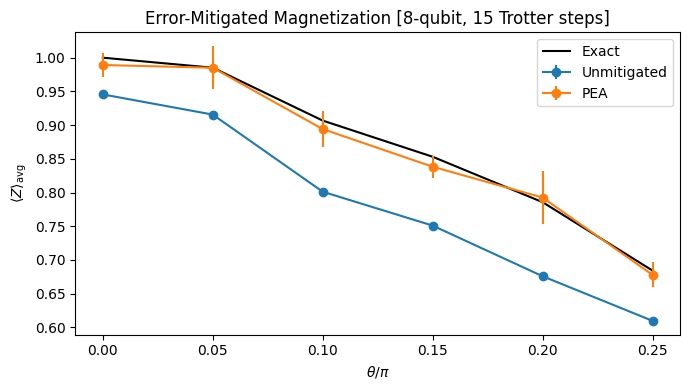
Ising 회전 각도 범위 전반에 걸쳐 각 방법의 사이트 평균 자화를 그립니다. PEA는 오차 막대 이내에서 정확한 자화를 복원하는 반면, 완화되지 않은 결과는 그보다 훨씬 낮게 편향되어 있습니다.
results = {
    "Unmitigated": unmitigated_res,
    "PEA": pea_mitigated_res,
}

fig, ax = plt.subplots(figsize=(7, 4))
ax.plot(x_vals, exact_evs.mean(axis=0), "k-", label="Exact")
for label, res in results.items():
    ax.errorbar(
        x_vals,
        np.mean(res.data.evs, axis=0),
        np.mean(res.data.stds, axis=0),
        fmt="o-",
        label=label,
    )
ax.set_xlabel(r"$\theta/\pi$")
ax.set_ylabel(r"$\langle Z \rangle_{\text{avg}}$")
ax.legend()
ax.set_title(
    f"Error-Mitigated Magnetization [{num_qubits}-qubit, {trotter_steps} Trotter steps]"
)
plt.tight_layout()
plt.show()