QESEM 함수로 2D 기울어진 장 이징 모델 시뮬레이션
Qiskit Functions는 IBM Quantum® Premium Plan, Flex Plan, On-Prem(IBM Quantum Platform API 경유) Plan 사용자에게만 제공되는 실험적 기능입니다. 현재 미리 보기 릴리스 상태로 변경될 수 있습니다.
사용 시간 추정: Heron r2 프로세서 기준 20분. (참고: 이 수치는 추정값이며, 실제 실행 시간은 다를 수 있습니다.)
배경
이 튜토리얼은 QESEM(Qedma의 Qiskit Function)을 사용하여 대표적인 양자 스핀 모델인 비-Clifford 각도의 2D 기울어진 장 이징(TFI) 모델의 동역학을 시뮬레이션하는 방법을 보여줍니다:
여기서 는 격자 위의 최근접 이웃을 나타냅니다. 다체 양자 시스템의 시간 진화를 시뮬레이션하는 것은 고전 컴퓨터에게 계산적으로 매우 어려운 과제입니다. 반면 양자 컴퓨터는 본질적으로 이 작업을 효율적으로 수행하도록 설계되어 있습니다. TFI 모델은 특히 풍부한 물리적 거동과 하드웨어 친화적인 구현 덕분에 양자 하드웨어의 인기 있는 벤치마크로 자리 잡았습니다.
연속 시간 동역학을 시뮬레이션하는 대신, 밀접하게 관련된 kicked Ising 모델을 채택합니다. 이 동역학은 주기적 양자 Circuit으로 정확하게 표현할 수 있으며, 각 진화 단계는 단일 qubit 게이트 및 레이어와 교차하는 분수 2-Qubit 게이트 의 세 레이어로 구성됩니다.
고전 시뮬레이션과 오류 완화 모두에 어려운 일반적인 각도를 사용할 것입니다. 구체적으로, 모델을 적분 가능한 점에서 멀리 배치하기 위해 , , 을 선택했습니다.
이 튜토리얼에서는 다음 작업을 수행합니다:
- QESEM의 분석적 및 경험적 시간 추정 기능을 사용하여 전체 오류 완화에 필요한 예상 QPU 런타임을 추정합니다.
- 하드웨어에서 영감을 받은 qubit 레이아웃과 게이트 레이어를 사용하여 2D 기울어진 장 이징 모델 Circuit을 구성하고 시뮬레이션합니다.
- 실험에 사용할 장치 qubit 연결성과 선택된 서브그래프를 시각화합니다.
- Circuit 깊이를 줄이기 위해 연산자 역전파(OBP)의 사용을 시연합니다. 이 기법은 더 많은 연산자 측정을 수행하는 대신 Circuit 끝에서 연산을 제거합니다.
- QESEM을 사용하여 여러 관측량에 대해 동시에 비편향 오류 완화(EM)를 수행하고, 이상적·잡음 있는·완화된 결과를 비교합니다.
- 다양한 Circuit 깊이에서 오류 완화가 자화(magnetization)에 미치는 영향을 분석하고 플롯합니다.
참고: OBP는 일반적으로 가능하게 비교환하는 관측량 집합을 반환합니다. QESEM은 대상 관측량에 비교환 항이 포함된 경우 측정 기저를 자동으로 최적화합니다. 여러 휴리스틱 알고리즘을 사용하여 후보 측정 기저 집합을 생성하고, 서로 다른 기저의 수를 최소화하는 집합을 선택합니다. 즉, QESEM은 호환 가능한 관측량을 공통 기저로 묶어 필요한 총 측정 구성 수를 줄여 효율성을 향상시킵니다.
QESEM 소개
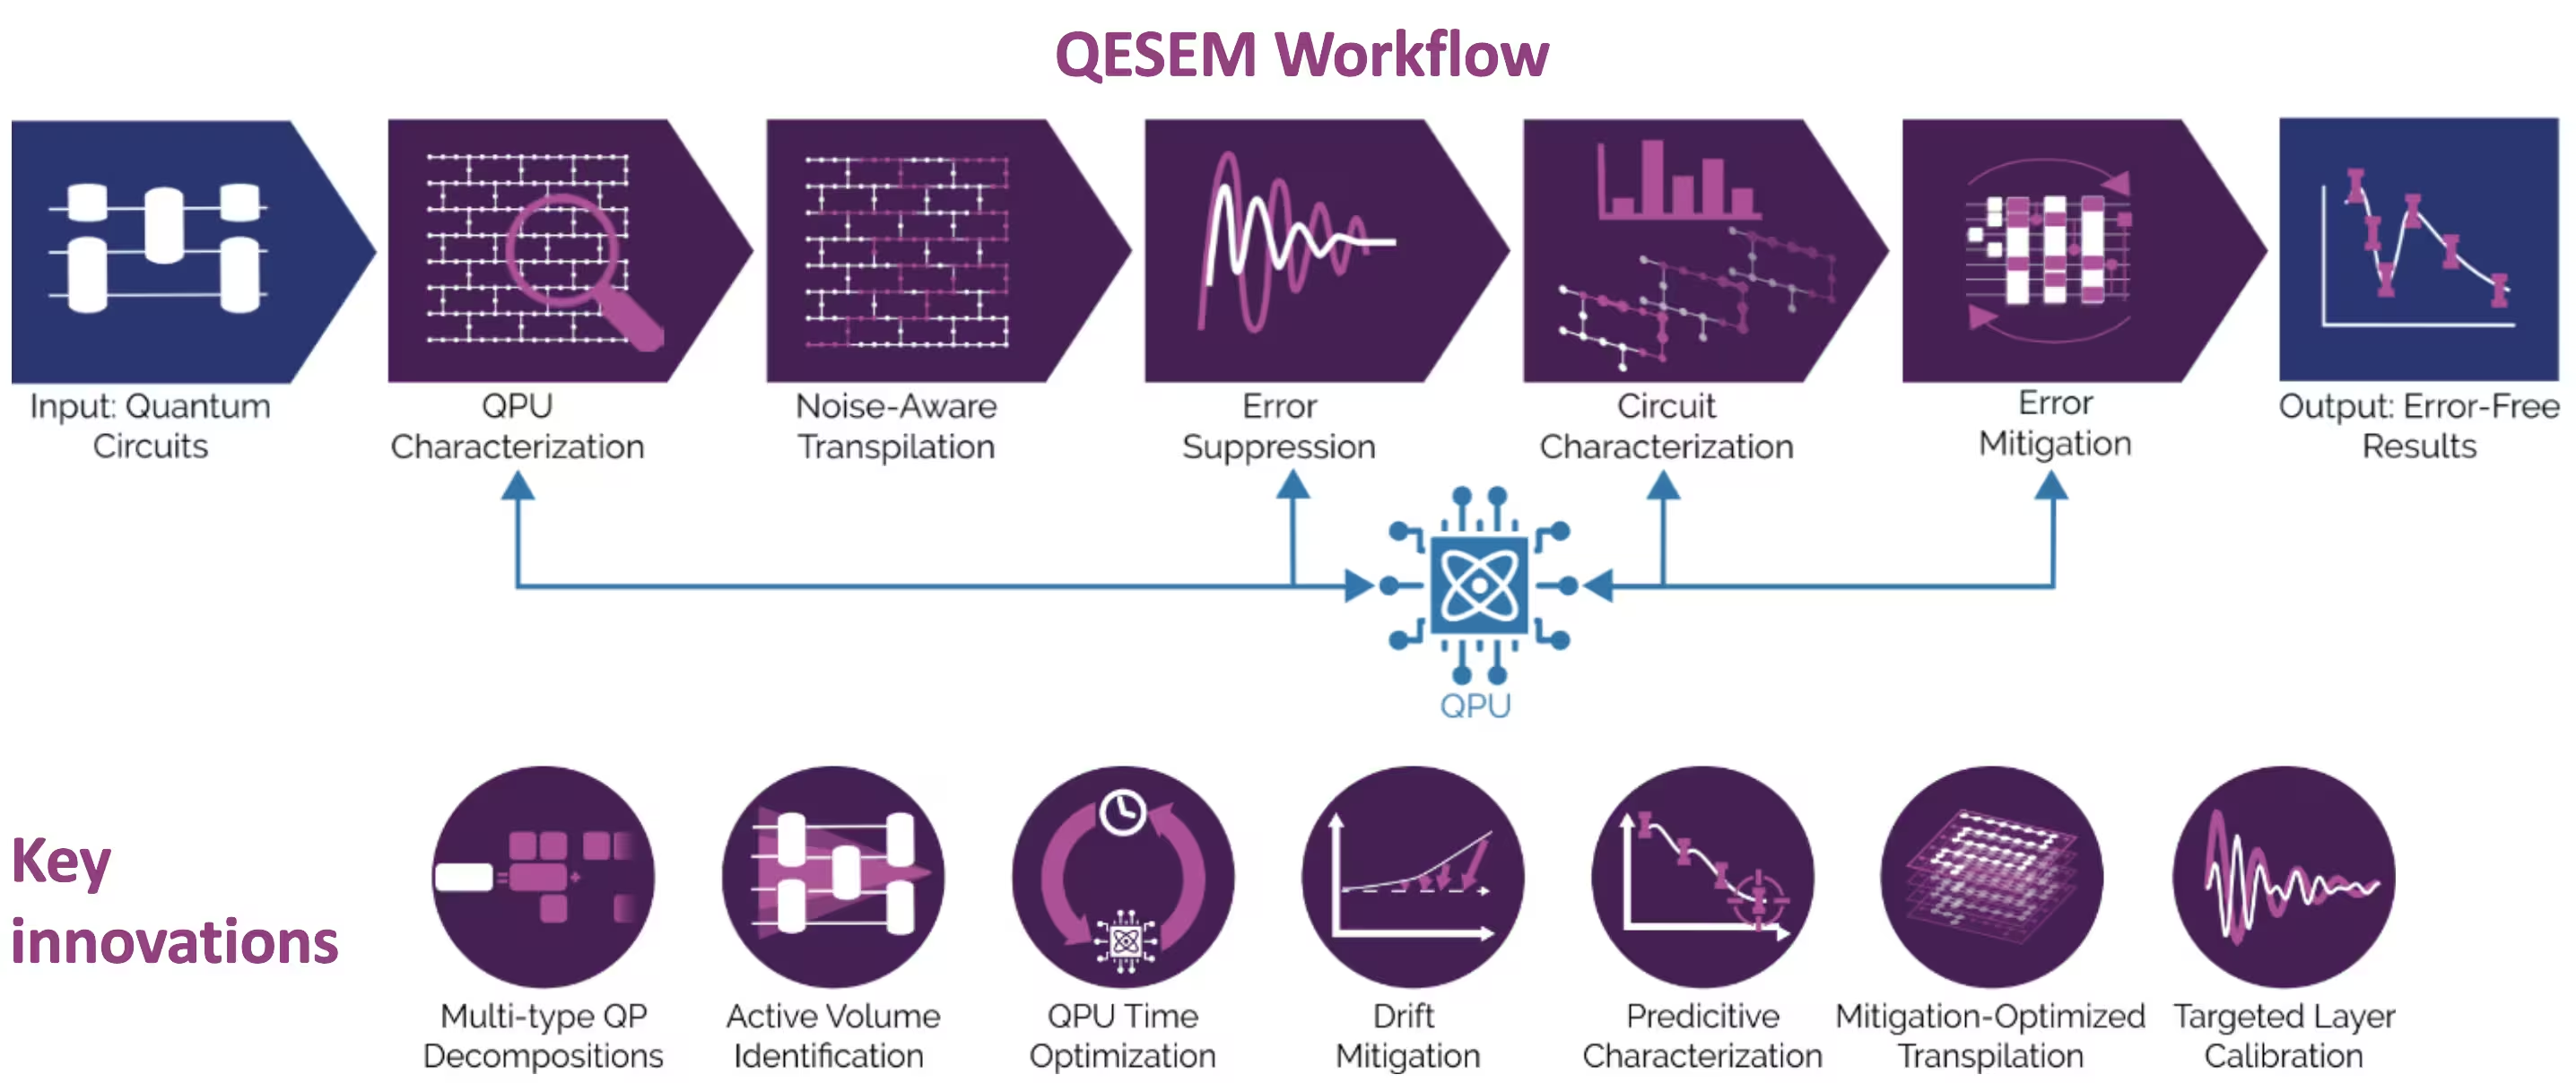
QESEM은 효율적이고 비편향적인 준확률적 오류 완화를 구현하는 신뢰할 수 있는 고정확도 특성 기반 소프트웨어입니다. 일반적인 양자 Circuit의 오류를 완화하도록 설계되었으며 응용 분야에 구애받지 않습니다. IBM® Eagle 및 Heron 장치에서의 유틸리티 규모 실험을 포함하여 다양한 하드웨어 플랫폼에서 검증되었습니다. QESEM 워크플로 단계는 다음과 같습니다:
- 장치 특성화 - 게이트 충실도를 매핑하고 coherent 오류를 식별하여 실시간 보정 데이터를 제공합니다. 이 단계는 완화가 사용 가능한 최고 충실도 연산을 활용하도록 보장합니다.
- 잡음 인식 트랜스파일 - 대안적인 qubit 매핑, 연산 집합, 측정 기저를 생성하고 평가하여 추정 QPU 런타임을 최소화하는 변형을 선택하며, 데이터 수집을 가속화하기 위한 선택적 병렬화를 제공합니다.
- 오류 억제 - 기본 게이트를 재정의하고, Pauli twirling을 적용하며, 충실도를 향상시키기 위해 펄스 수준 제어(지원 플랫폼에서)를 최적화합니다.
- Circuit 특성화 - 맞춤형 로컬 오류 모델을 구축하고 QPU 측정에 맞게 피팅하여 잔류 잡음을 정량화합니다.
- 오류 완화 - 다중 유형 준확률적 분해를 구성하고, 완화 QPU 시간과 하드웨어 변동에 대한 민감도를 최소화하는 적응적 프로세스에서 샘플링하여 대용량 Circuit에서 높은 정확도를 달성합니다.
QESEM에 대한 자세한 정보와 ibm_marrakesh의 기본 heavy-hex 기하학에서 103-Qubit 고연결성 서브그래프에 대한 이 모델의 유틸리티 규모 실험은 Reliable high-accuracy error mitigation for utility-scale quantum circuits를 참조하세요.
요구 사항
노트북을 실행하기 전에 다음 Python 패키지를 설치하세요:
- Qiskit SDK v2.0.0 이상 (
pip install qiskit) - Qiskit Runtime v0.40.0 이상 (
pip install qiskit-ibm-runtime) - Qiskit Functions Catalog v0.8.0 이상 (
pip install qiskit-ibm-catalog) - Operator Backpropagation Qiskit addon v0.3.0 이상 (
pip install qiskit-addon-obp) - Qiskit Utils addon v0.1.1 이상 (
pip install qiskit-addon-utils) - Qiskit Aer 시뮬레이터 v0.17.1 이상 (
pip install qiskit-aer) - Matplotlib v3.10.3 이상 (
pip install matplotlib)
설정
먼저 관련 라이브러리를 가져옵니다:
# Added by doQumentation — required packages for this notebook
!pip install -q matplotlib numpy qiskit qiskit-addon-obp qiskit-addon-utils qiskit-aer qiskit-ibm-catalog qiskit-ibm-runtime
%matplotlib inline

from typing import Sequence

import matplotlib.pyplot as plt
import numpy as np

import qiskit
from qiskit_ibm_runtime import EstimatorV2 as Estimator
from qiskit_ibm_catalog import QiskitFunctionsCatalog
from qiskit_aer import AerSimulator
from qiskit_addon_utils.slicing import combine_slices, slice_by_gate_types
from qiskit_addon_obp import backpropagate
from qiskit_addon_obp.utils.simplify import OperatorBudget
from qiskit_ibm_runtime import QiskitRuntimeService
from qiskit.visualization import (
    plot_gate_map,
)
다음으로, IBM Quantum Platform 대시보드의 API 키를 사용하여 인증합니다. 그런 다음 아래와 같이 Qiskit Function을 선택합니다. (보안을 위해, 신뢰할 수 있는 기기를 사용하는 경우 매번 API 키를 입력하지 않아도 되도록 계정 자격 증명을 로컬 환경에 저장해 두는 것이 좋습니다.)
# Paste here your instance and token strings

instance = "YOUR_INSTANCE"
token = "YOUR_TOKEN"
channel = "ibm_quantum_platform"

catalog = QiskitFunctionsCatalog(
    channel=channel, token=token, instance=instance
)
qesem_function = catalog.load("qedma/qesem")
1단계: 고전적 입력을 양자 문제로 매핑하기
먼저 Trotter Circuit을 생성하는 함수를 정의합니다:
def trotter_circuit_from_layers(
    steps: int,
    theta_x: float,
    theta_z: float,
    theta_zz: float,
    layers: Sequence[Sequence[tuple[int, int]]],
    init_state: str | None = None,
) -> qiskit.QuantumCircuit:
    """
    Generates an ising trotter circuit
    :param steps: trotter steps
    :param theta_x: RX angle
    :param theta_z: RZ angle
    :param theta_zz: RZZ angle
    :param layers: list of layers (can be list of layers in device)
    :param init_state: Initial state to prepare.
     If None, will not prepare any state. If "+", will
     add Hadamard gates to all qubits.
    :return: QuantumCircuit
    """
    qubits = sorted({i for layer in layers for edge in layer for i in edge})
    circ = qiskit.QuantumCircuit(max(qubits) + 1)

    if init_state == "+":
        print("init_state = +")
        for q in qubits:
            circ.h(q)

    for _ in range(steps):
        for q in qubits:
            circ.rx(theta_x, q)
            circ.rz(theta_z, q)

        for layer in layers:
            for edge in layer:
                circ.rzz(theta_zz, *edge)
        circ.barrier(qubits)

    return circ
다음으로 AerSimulator를 사용하여 이상적인 기댓값을 계산하는 함수를 만듭니다.
대규모 Circuit(30개 이상의 qubit)의 경우, belief-propagation(BP) PEPS 시뮬레이션에서 미리 계산된 값을 사용하는 것을 권장합니다. 이 코드에는 35 Qubit에 대한 미리 계산된 값이 예시로 포함되어 있으며, 이 논문에서 소개된 PEPS 텐서 네트워크를 진화시키는 BP 방식(PEPS-BP라고 지칭)과 텐서 네트워크 Python 패키지 quimb를 기반으로 합니다.
def calculate_ideal_evs(circ, obs, num_qubits, step):
    # Predefined results for large circuits - calculated using
    # bppeps for 3, 5, 7, 9 trotter steps
    predefined_35 = [
        0.79537,
        0.78653,
        0.79699,
    ]

    if num_qubits == 35:
        print(
            "Using precalculated ideal values for large circuits calculated "
            "with belief propagation PEPS. Currently only for 35 qubits."
        )
        return predefined_35[step]

    else:
        simulator = AerSimulator()

        # Use Estimator primitive to get expectation value
        estimator = Estimator(simulator)
        sim_result = estimator.run([(circ, [obs])], precision=0.0001).result()

        # Extracting the result
        ideal_values = sim_result[0].data.evs[0]
        return ideal_values
하드웨어 기반의 레이어 매핑은 Heron 디바이스에서 가져온 것으로, 시뮬레이션하려는 qubit 수에 맞게 레이어를 잘라냅니다. 2D 구조를 유지하는 10, 21, 28, 35 Qubit에 대한 서브그래프를 정의합니다(원하시는 서브그래프로 자유롭게 변경하세요):
LAYERS_HERON_R2 = [  # the full set of hardware layers for Heron r2
    [
        (2, 3),
        (6, 7),
        (10, 11),
        (14, 15),
        (20, 21),
        (16, 23),
        (24, 25),
        (17, 27),
        (28, 29),
        (18, 31),
        (32, 33),
        (19, 35),
        (36, 41),
        (42, 43),
        (37, 45),
        (46, 47),
        (38, 49),
        (50, 51),
        (39, 53),
        (60, 61),
        (56, 63),
        (64, 65),
        (57, 67),
        (68, 69),
        (58, 71),
        (72, 73),
        (59, 75),
        (76, 81),
        (82, 83),
        (77, 85),
        (86, 87),
        (78, 89),
        (90, 91),
        (79, 93),
        (94, 95),
        (100, 101),
        (96, 103),
        (104, 105),
        (97, 107),
        (108, 109),
        (98, 111),
        (112, 113),
        (99, 115),
        (116, 121),
        (122, 123),
        (117, 125),
        (126, 127),
        (118, 129),
        (130, 131),
        (119, 133),
        (134, 135),
        (140, 141),
        (136, 143),
        (144, 145),
        (137, 147),
        (148, 149),
        (138, 151),
        (152, 153),
        (139, 155),
    ],
    [
        (1, 2),
        (3, 4),
        (5, 6),
        (7, 8),
        (9, 10),
        (11, 12),
        (13, 14),
        (21, 22),
        (23, 24),
        (25, 26),
        (27, 28),
        (29, 30),
        (31, 32),
        (33, 34),
        (40, 41),
        (43, 44),
        (45, 46),
        (47, 48),
        (49, 50),
        (51, 52),
        (53, 54),
        (55, 59),
        (61, 62),
        (63, 64),
        (65, 66),
        (67, 68),
        (69, 70),
        (71, 72),
        (73, 74),
        (80, 81),
        (83, 84),
        (85, 86),
        (87, 88),
        (89, 90),
        (91, 92),
        (93, 94),
        (95, 99),
        (101, 102),
        (103, 104),
        (105, 106),
        (107, 108),
        (109, 110),
        (111, 112),
        (113, 114),
        (120, 121),
        (123, 124),
        (125, 126),
        (127, 128),
        (129, 130),
        (131, 132),
        (133, 134),
        (135, 139),
        (141, 142),
        (143, 144),
        (145, 146),
        (147, 148),
        (149, 150),
        (151, 152),
        (153, 154),
    ],
    [
        (3, 16),
        (7, 17),
        (11, 18),
        (22, 23),
        (26, 27),
        (30, 31),
        (34, 35),
        (21, 36),
        (25, 37),
        (29, 38),
        (33, 39),
        (41, 42),
        (44, 45),
        (48, 49),
        (52, 53),
        (43, 56),
        (47, 57),
        (51, 58),
        (62, 63),
        (66, 67),
        (70, 71),
        (74, 75),
        (61, 76),
        (65, 77),
        (69, 78),
        (73, 79),
        (81, 82),
        (84, 85),
        (88, 89),
        (92, 93),
        (83, 96),
        (87, 97),
        (91, 98),
        (102, 103),
        (106, 107),
        (110, 111),
        (114, 115),
        (101, 116),
        (105, 117),
        (109, 118),
        (113, 119),
        (121, 122),
        (124, 125),
        (128, 129),
        (132, 133),
        (123, 136),
        (127, 137),
        (131, 138),
        (142, 143),
        (146, 147),
        (150, 151),
        (154, 155),
        (0, 1),
        (4, 5),
        (8, 9),
        (12, 13),
        (54, 55),
        (15, 19),
    ],
]

subgraphs = {  # the subgraphs for the different qubit counts such that it's 2D
    10: list(range(22, 29)) + [16, 17, 37],
    21: list(range(3, 12)) + list(range(23, 32)) + [16, 17, 18],
    28: list(range(3, 12))
    + list(range(23, 32))
    + list(range(45, 50))
    + [16, 17, 18, 37, 38],
    35: list(range(3, 12))
    + list(range(21, 32))
    + list(range(41, 50))
    + [16, 17, 18, 36, 37, 38],
    42: list(range(3, 12))
    + list(range(21, 32))
    + list(range(41, 50))
    + list(range(63, 68))
    + [16, 17, 18, 36, 37, 38, 56, 57],
}

n_qubits = 35  # 21, 28, 35, 42
layers = [
    [
        edge
        for edge in layer
        if edge[0] in subgraphs[n_qubits] and edge[1] in subgraphs[n_qubits]
    ]
    for layer in LAYERS_HERON_R2
]

print(layers)
[[(6, 7), (10, 11), (16, 23), (24, 25), (17, 27), (28, 29), (18, 31), (36, 41), (42, 43), (37, 45), (46, 47), (38, 49)], [(3, 4), (5, 6), (7, 8), (9, 10), (21, 22), (23, 24), (25, 26), (27, 28), (29, 30), (43, 44), (45, 46), (47, 48)], [(3, 16), (7, 17), (11, 18), (22, 23), (26, 27), (30, 31), (21, 36), (25, 37), (29, 38), (41, 42), (44, 45), (48, 49), (4, 5), (8, 9)]]
이제 선택된 서브그래프에 대해 Heron 장치에서의 qubit 배치를 시각화합니다:
service = QiskitRuntimeService(
    channel=channel,
    token=token,
    instance=instance,
)
backend = service.backend("ibm_fez")  # or any available device

selected_qubits = subgraphs[n_qubits]
num_qubits = backend.configuration().num_qubits
qubit_color = [
    "#ff7f0e" if i in selected_qubits else "#d3d3d3"
    for i in range(num_qubits)
]

plot_gate_map(
    backend=backend,
    figsize=(15, 10),
    qubit_color=qubit_color,
)
plt.show()
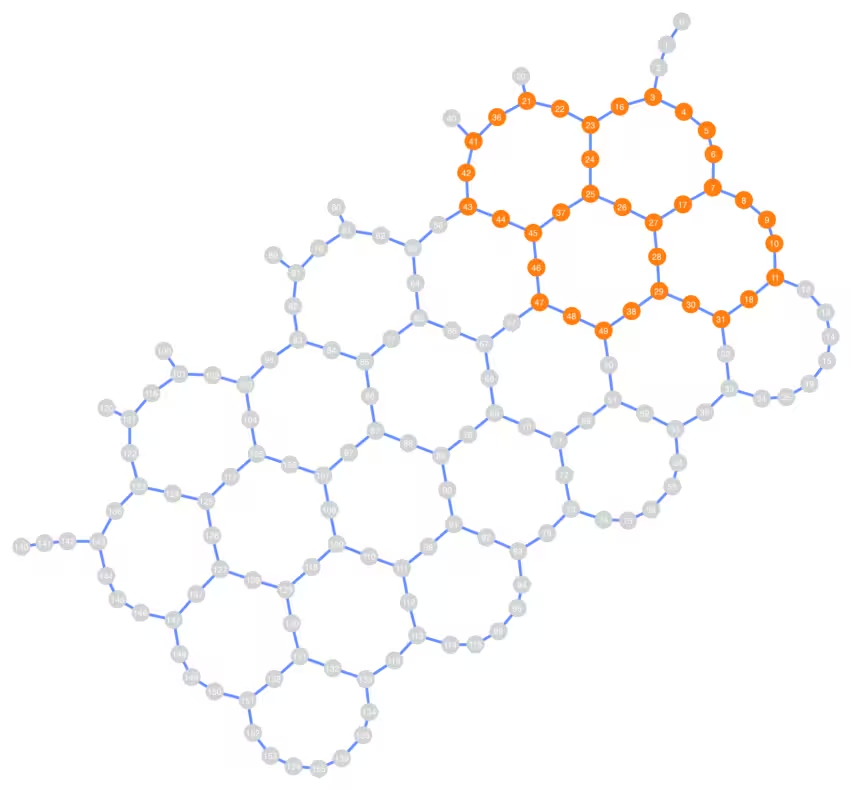
선택한 qubit 배치의 연결성이 반드시 선형일 필요는 없으며, 선택한 qubit 수에 따라 Heron 장치의 넓은 영역을 차지할 수 있습니다.
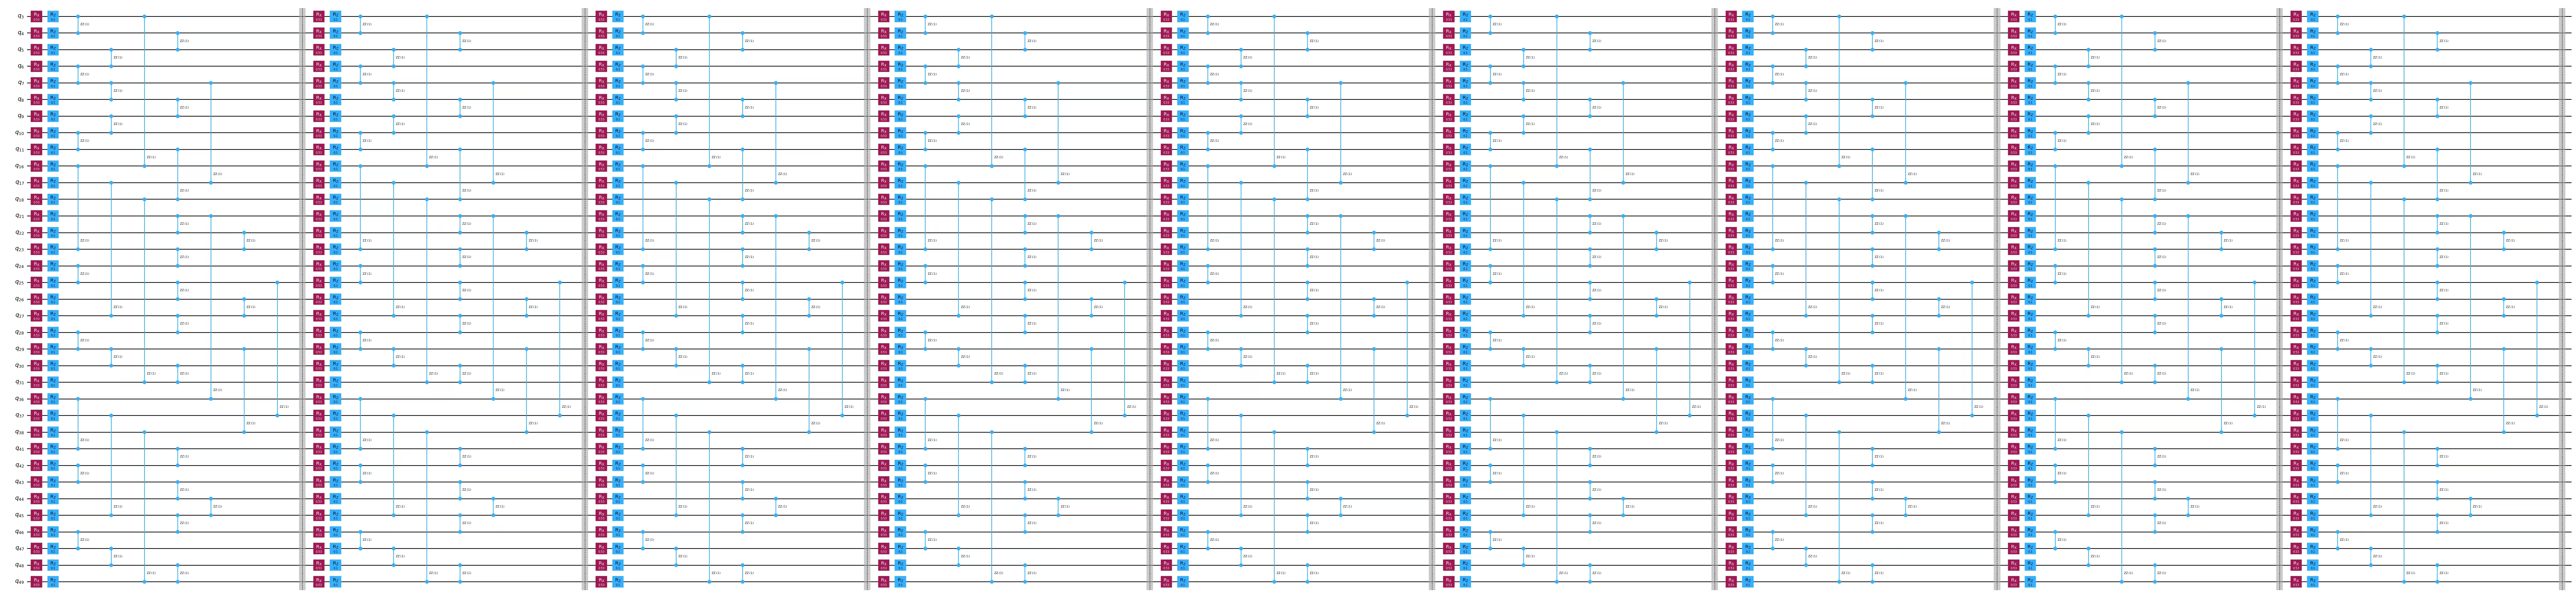
이제 선택한 qubit 수와 파라미터에 대해 Trotter Circuit과 평균 자화(magnetization) 관측량을 생성합니다:
# Chosen parameters:
theta_x = 0.53
theta_z = 0.1
theta_zz = 1.0
steps = 9

circ = trotter_circuit_from_layers(steps, theta_x, theta_z, theta_zz, layers)
print(
    f"Circuit 2q layers: "
    f"{circ.depth(filter_function=lambda instr: len(instr.qubits) == 2)}"
)
print("\nCircuit structure:")

circ.draw("mpl", scale=0.8, fold=-1, idle_wires=False)
plt.show()

observable = qiskit.quantum_info.SparsePauliOp.from_sparse_list(
    [("Z", [q], 1 / n_qubits) for q in subgraphs[n_qubits]],
    np.max(subgraphs[n_qubits]) + 1,
)  # Average magnetization observable

print(observable)
obs_list = [observable]
Circuit 2q layers: 27

Circuit structure:
SparsePauliOp(['IIIIIIIIIIIIIIIIIIIIIIIIIIIIIIIIIIIIIIIIIIIIIIZIII', 'IIIIIIIIIIIIIIIIIIIIIIIIIIIIIIIIIIIIIIIIIIIIIZIIII', 'IIIIIIIIIIIIIIIIIIIIIIIIIIIIIIIIIIIIIIIIIIIIZIIIII', 'IIIIIIIIIIIIIIIIIIIIIIIIIIIIIIIIIIIIIIIIIIIZIIIIII', 'IIIIIIIIIIIIIIIIIIIIIIIIIIIIIIIIIIIIIIIIIIZIIIIIII', 'IIIIIIIIIIIIIIIIIIIIIIIIIIIIIIIIIIIIIIIIIZIIIIIIII', 'IIIIIIIIIIIIIIIIIIIIIIIIIIIIIIIIIIIIIIIIZIIIIIIIII', 'IIIIIIIIIIIIIIIIIIIIIIIIIIIIIIIIIIIIIIIZIIIIIIIIII', 'IIIIIIIIIIIIIIIIIIIIIIIIIIIIIIIIIIIIIIZIIIIIIIIIII', 'IIIIIIIIIIIIIIIIIIIIIIIIIIIIZIIIIIIIIIIIIIIIIIIIII', 'IIIIIIIIIIIIIIIIIIIIIIIIIIIZIIIIIIIIIIIIIIIIIIIIII', 'IIIIIIIIIIIIIIIIIIIIIIIIIIZIIIIIIIIIIIIIIIIIIIIIII', 'IIIIIIIIIIIIIIIIIIIIIIIIIZIIIIIIIIIIIIIIIIIIIIIIII', 'IIIIIIIIIIIIIIIIIIIIIIIIZIIIIIIIIIIIIIIIIIIIIIIIII', 'IIIIIIIIIIIIIIIIIIIIIIIZIIIIIIIIIIIIIIIIIIIIIIIIII', 'IIIIIIIIIIIIIIIIIIIIIIZIIIIIIIIIIIIIIIIIIIIIIIIIII', 'IIIIIIIIIIIIIIIIIIIIIZIIIIIIIIIIIIIIIIIIIIIIIIIIII', 'IIIIIIIIIIIIIIIIIIIIZIIIIIIIIIIIIIIIIIIIIIIIIIIIII', 'IIIIIIIIIIIIIIIIIIIZIIIIIIIIIIIIIIIIIIIIIIIIIIIIII', 'IIIIIIIIIIIIIIIIIIZIIIIIIIIIIIIIIIIIIIIIIIIIIIIIII', 'IIIIIIIIZIIIIIIIIIIIIIIIIIIIIIIIIIIIIIIIIIIIIIIIII', 'IIIIIIIZIIIIIIIIIIIIIIIIIIIIIIIIIIIIIIIIIIIIIIIIII', 'IIIIIIZIIIIIIIIIIIIIIIIIIIIIIIIIIIIIIIIIIIIIIIIIII', 'IIIIIZIIIIIIIIIIIIIIIIIIIIIIIIIIIIIIIIIIIIIIIIIIII', 'IIIIZIIIIIIIIIIIIIIIIIIIIIIIIIIIIIIIIIIIIIIIIIIIII', 'IIIZIIIIIIIIIIIIIIIIIIIIIIIIIIIIIIIIIIIIIIIIIIIIII', 'IIZIIIIIIIIIIIIIIIIIIIIIIIIIIIIIIIIIIIIIIIIIIIIIII', 'IZIIIIIIIIIIIIIIIIIIIIIIIIIIIIIIIIIIIIIIIIIIIIIIII', 'ZIIIIIIIIIIIIIIIIIIIIIIIIIIIIIIIIIIIIIIIIIIIIIIIII', 'IIIIIIIIIIIIIIIIIIIIIIIIIIIIIIIIIZIIIIIIIIIIIIIIII', 'IIIIIIIIIIIIIIIIIIIIIIIIIIIIIIIIZIIIIIIIIIIIIIIIII', 'IIIIIIIIIIIIIIIIIIIIIIIIIIIIIIIZIIIIIIIIIIIIIIIIII', 'IIIIIIIIIIIIIZIIIIIIIIIIIIIIIIIIIIIIIIIIIIIIIIIIII', 'IIIIIIIIIIIIZIIIIIIIIIIIIIIIIIIIIIIIIIIIIIIIIIIIII', 'IIIIIIIIIIIZIIIIIIIIIIIIIIIIIIIIIIIIIIIIIIIIIIIIII'],
              coeffs=[0.02857143+0.j, 0.02857143+0.j, 0.02857143+0.j, 0.02857143+0.j,
 0.02857143+0.j, 0.02857143+0.j, 0.02857143+0.j, 0.02857143+0.j,
 0.02857143+0.j, 0.02857143+0.j, 0.02857143+0.j, 0.02857143+0.j,
 0.02857143+0.j, 0.02857143+0.j, 0.02857143+0.j, 0.02857143+0.j,
 0.02857143+0.j, 0.02857143+0.j, 0.02857143+0.j, 0.02857143+0.j,
 0.02857143+0.j, 0.02857143+0.j, 0.02857143+0.j, 0.02857143+0.j,
 0.02857143+0.j, 0.02857143+0.j, 0.02857143+0.j, 0.02857143+0.j,
 0.02857143+0.j, 0.02857143+0.j, 0.02857143+0.j, 0.02857143+0.j,
 0.02857143+0.j, 0.02857143+0.j, 0.02857143+0.j])
2단계: 양자 하드웨어 실행을 위한 문제 최적화
OBP 적용 전후 QPU 시간 예측
사용자는 일반적으로 실험에 필요한 QPU 시간이 얼마나 되는지 알고 싶어합니다. 그러나 이는 고전 컴퓨터에게는 어려운 문제로 여겨집니다.
QESEM은 사용자가 실험의 실현 가능성을 판단할 수 있도록 두 가지 시간 예측 모드를 제공합니다:
- 분석적 시간 예측 — 매우 거친 추정값을 제공하며 QPU 시간이 필요 없습니다. 트랜스파일 패스가 QPU 시간을 줄일 수 있는지 테스트하는 데 활용할 수 있습니다.
- 경험적 시간 예측 (여기서 시연) — 비교적 정확한 추정값을 제공하며 몇 분의 QPU 시간을 사용합니다.
두 경우 모두 QESEM은 모든 관측량에 대해 요구된 정밀도에 도달하기 위한 시간 추정값을 출력합니다.
run_on_real_hardware = True

precision = 0.05
if run_on_real_hardware:
    backend_name = "ibm_fez"
else:
    backend_name = "fake_fez"

# Start a job for empirical time estimation
estimation_job_wo_obp = qesem_function.run(
    pubs=[(circ, obs_list)],
    instance=instance,
    backend_name=backend_name,  # E.g. "ibm_brisbane"
    options={
        # "empirical" - gets actual time estimates without running full mitigation
        "estimate_time_only": "empirical",
        "max_execution_time": 120,  # Limits the QPU time, specified in seconds.
        "default_precision": precision,
    },
)
print(estimation_job_wo_obp.job_id)
print(estimation_job_wo_obp.status())
17d3828e-9fdb-482e-8e9b-392f3eefe313
DONE
# Get the result object (blocking method).
# Use job.status() in a loop for non-blocking.
# This takes 1-3 minutes
result = estimation_job_wo_obp.result()
print(
    f"Empirical time estimation (sec): {result[0].metadata['time_estimation_sec']}"
)
Empirical time estimation (sec): 1200
이제 연산자 역전파(OBP)를 사용할 것입니다. (OBP Qiskit 애드온에 대한 자세한 내용은 OBP 문서를 참조하세요.) 역전파를 위한 Circuit 슬라이스를 생성하는 함수를 만들겠습니다:
def run_backpropagation(circ_vec, observable, steps_vec, max_qwc_groups=8):
    """
    Runs backpropagation for a list of circuits and observables.
    Returns lists of backpropagated circuits and observables.
    """
    op_budget = OperatorBudget(max_qwc_groups=max_qwc_groups)
    bp_circuit_vec = []
    bp_observable_vec = []

    for i, circ in enumerate(circ_vec):
        slices = slice_by_gate_types(circ)
        bp_observable, remaining_slices, metadata = backpropagate(
            observable,
            slices,
            operator_budget=op_budget,
        )
        bp_circuit = combine_slices(remaining_slices, include_barriers=True)
        bp_circuit_vec.append(bp_circuit)
        bp_observable_vec.append(bp_observable)
        print(f"n.o. steps: {steps_vec[i]}")
        print(f"Backpropagated {metadata.num_backpropagated_slices} slices.")
        print(
            f"New observable has {len(bp_observable.paulis)} terms, "
            f"which can be combined into "
            f"{len(bp_observable.group_commuting(qubit_wise=True))} groups.\n"
            f"After truncation, the error in our observable is bounded by "
            f"{metadata.accumulated_error(0):.3e}"
        )
        print("-----------------")
    return bp_circuit_vec, bp_observable_vec
함수를 호출합니다:
bp_circ_vec, bp_obs_vec = run_backpropagation([circ], observable, [steps])
n.o. steps: 9
Backpropagated 11 slices.
New observable has 363 terms, which can be combined into 4 groups.
After truncation, the error in our observable is bounded by 0.000e+00
-----------------
print("The remaining circuit after backpropagation looks as follows:")
bp_circ_vec[-1].draw("mpl", scale=0.8, fold=-1, idle_wires=False)
None
The remaining circuit after backpropagation looks as follows:

역전파를 통해 Circuit의 두 레이어가 줄어든 것을 확인할 수 있습니다. 이제 축소된 Circuit과 확장된 관측량을 얻었으므로, 역전파된 Circuit에 대해 시간 예측을 수행해 보겠습니다:
# Start a job for empirical time estimation
estimation_job_obp = qesem_function.run(
    pubs=[(bp_circ_vec[-1], [bp_obs_vec[-1]])],
    instance=instance,
    backend_name=backend_name,
    options={
        "estimate_time_only": "empirical",
        "max_execution_time": 120,
        "default_precision": precision,
    },
)
print(estimation_job_obp.job_id)
print(estimation_job_obp.status())
8bae699d-a16b-4d39-bbd9-d123fbcce55d
DONE
result_obp = estimation_job_obp.result()
print(
    f"Empirical time estimation (sec): {result_obp[0].metadata['time_estimation_sec']}"
)
Empirical time estimation (sec): 900
OBP가 Circuit 오류 완화에 소요되는 시간 비용을 줄여준다는 것을 확인할 수 있습니다.
Step 3: Qiskit 프리미티브를 사용하여 실행
실제 Backend에서 실행
이제 몇 가지 Trotter 단계로 전체 실험을 실행합니다. Qubit 수, 요구 정밀도, 최대 QPU 시간은 사용 가능한 QPU 리소스에 맞게 조정할 수 있습니다. 최대 QPU 시간을 제한하면 아래의 최종 플롯에서 확인할 수 있듯이 최종 정밀도에 영향을 미칩니다.
5, 7, 9 Trotter 단계로 구성된 네 가지 Circuit을 정밀도 0.05로 분석하고, 이상적인 기댓값, 노이즈가 있는 기댓값, 오류 완화된 기댓값을 비교합니다.
steps_vec = [5, 7, 9]

circ_vec = []
for steps in steps_vec:
    circ = trotter_circuit_from_layers(
        steps, theta_x, theta_z, theta_zz, layers
    )
    circ_vec.append(circ)
마찬가지로, 런타임을 줄이기 위해 각 Circuit에 OBP를 수행합니다.
bp_circ_vec_35, bp_obs_vec_35 = run_backpropagation(
    circ_vec, observable, steps_vec
)
n.o. steps: 5
Backpropagated 11 slices.
New observable has 363 terms, which can be combined into 4 groups.
After truncation, the error in our observable is bounded by 0.000e+00
-----------------
n.o. steps: 7
Backpropagated 11 slices.
New observable has 363 terms, which can be combined into 4 groups.
After truncation, the error in our observable is bounded by 0.000e+00
-----------------
n.o. steps: 9
Backpropagated 11 slices.
New observable has 363 terms, which can be combined into 4 groups.
After truncation, the error in our observable is bounded by 0.000e+00
-----------------
이제 전체 QESEM 작업을 일괄 실행합니다. QPU 예산을 더 잘 관리하기 위해 각 포인트의 최대 QPU 런타임을 제한합니다.
run_on_real_hardware = True

precision = 0.05
if run_on_real_hardware:
    backend_name = "ibm_marrakesh"
else:
    backend_name = "fake_fez"
# Running full jobs for:
pubs_list = [
    [(bp_circ_vec_35[i], bp_obs_vec_35[i])] for i in range(len(bp_obs_vec_35))
]
# Initiating multiple jobs for different lengths
job_list = []
for pubs in pubs_list:
    job_obp = qesem_function.run(
        pubs=pubs,
        instance=instance,
        backend_name=backend_name,  # E.g. "ibm_brisbane"
        options={
            "max_execution_time": 300,  # Limits the QPU time, specified in seconds.
            "default_precision": 0.05,
        },
    )
    job_list.append(job_obp)
각 작업의 상태를 확인합니다.
for job in job_list:
    print(job.status())
DONE
DONE
DONE
DONE
Step 4: 결과를 원하는 클래식 형식으로 후처리 및 반환
모든 작업이 완료되면 노이즈가 있는 기댓값과 완화된 기댓값을 비교할 수 있습니다.
ideal_values = []
noisy_values = []
error_mitigated_values = []
error_mitigated_stds = []

for i in range(len(job_list)):
    job = job_list[i]
    result = job.result()  # Blocking - takes 3-5 minutes
    noisy_results = result[0].metadata["noisy_results"]

    ideal_val = calculate_ideal_evs(circ_vec[i], observable, n_qubits, i)
    print("---------------------------------")
    print(f"Ideal: {ideal_val}")
    print(f"Noisy: {noisy_results.evs}")
    print(f"QESEM: {result[0].data.evs} \u00b1 {result[0].data.stds}")

    ideal_values.append(ideal_val)
    noisy_values.append(noisy_results.evs)
    error_mitigated_values.append(result[0].data.evs)
    error_mitigated_stds.append(result[0].data.stds)
Using precalculated ideal values for large circuits calculated with belief propagation PEPS. Currently only for 35 qubits.
---------------------------------
Ideal: 0.79537
Noisy: 0.7039237951821501
QESEM: 0.7828018244130982 ± 0.013257266977728376
Using precalculated ideal values for large circuits calculated with belief propagation PEPS. Currently only for 35 qubits.
---------------------------------
Ideal: 0.78653
Noisy: 0.6478583812958806
QESEM: 0.7875259197423828 ± 0.02703045139248604
Using precalculated ideal values for large circuits calculated with belief propagation PEPS. Currently only for 35 qubits.
---------------------------------
Ideal: 0.79699
Noisy: 0.6171787879868142
QESEM: 0.6918791909168913 ± 0.0740873782039517
마지막으로, 단계 수에 따른 자기화(magnetization)를 플롯할 수 있습니다. 이는 노이즈가 있는 양자 장치에서 편향 없는 오류 완화를 위해 QESEM Qiskit Function을 사용하는 이점을 요약합니다.
plt.plot(steps_vec, ideal_values, "--", label="ideal")
plt.scatter(steps_vec, noisy_values, label="noisy")
plt.errorbar(
    steps_vec,
    error_mitigated_values,
    yerr=error_mitigated_stds,
    fmt="o",
    capsize=5,
    label="QESEM mitigation",
)
plt.legend()
plt.xlabel("n.o. steps")
plt.ylabel("Magnetization")
Text(0, 0.5, 'Magnetization')

9번째 단계는 QPU 시간을 5분으로 제한했기 때문에 통계적 오차 막대가 큽니다. 이 단계를 경험적 시간 추정치에 따라 15분 동안 실행하면 더 작은 오차 막대를 얻을 수 있습니다. 따라서 완화된 값이 이상적인 값에 더 가까워집니다.